Skip to content
“Plug it in and forget it” sounds great—until you realize not all plugs are created equal. Understanding EV charging levels isn’t trivia; it’s the difference between waking up to a full battery or a range-anxiety morning. This guide breaks down EV charging levels, compares charging options for electric cars, and focuses on home car charging solutions, enabling you to select the right electric car charger for your home with confidence.
EV Charging Explained in Plain English
What “EV charging levels” actually mean
In North America and many other regions, AC charging is grouped into:
- Review panel size (e.g., 100A vs 200A).
- Calculate your home’s existing loads (HVAC, oven, dryer).
- Determine a safe breaker size (often 40–60A) and wire gauge.
Dedicated circuit, GFCI, permits, and code
- Dedicated circuit prevents nuisance trips and ensures safe, continuous load.
- GFCI protection is required in many jurisdictions.
- Permits & inspections keep installs safe and compliant—don’t skip them.
Indoor vs. outdoor installs, cable management
- Outdoor-rated enclosures (NEMA 3R/4/4X) handle weather.
- Consider cable length (often 18–25 ft), hanger solutions, and parking orientation for daily convenience.
Costs You Should Expect
Hardware price ranges (Level 1 vs. Level 2)
- Level 1: Often included with the car (portable EVSE), or $90–$200 if purchased.
- Level 2 wallbox: Commonly $300–$700 for reputable models; premium smart units can reach $900+.
Installation cost factors
- Distance from panel to charger (conduit, trenching).
- Panel upgrades (e.g., 100A → 200A).
- Permits and local labor rates.
Typical installs range from a few hundred dollars to a few thousand if panel upgrades or long runs are needed.
- Permits and local labor rates.
Electricity rates, TOU plans, and how to save
Ask your utility about Time-of-Use (TOU) rates. Charging off-peak (often overnight) can cut costs dramatically—especially with Level 2’s faster refill.
Real-World Charging Times
Examples for 40 kWh, 60 kWh, 80 kWh batteries
Assume 10%–90% daily cycling for battery longevity (adding ~80% of total capacity):
40 kWh pack (add ~32 kWh):
- Level 1 (1.4 kW): ~32 ÷ 1.4 ≈ 23 hours
- Level 2 (7.2 kW): ~32 ÷ 7.2 ≈ 4.5 hours
- Level 2 (9.6 kW): ~32 ÷ 9.6 ≈ 3.3 hours
60 kWh pack (add ~48 kWh):
- Level 1 (1.4 kW): ~48 ÷ 1.4 ≈ 34 hours
- Level 2 (7.2 kW): ~48 ÷ 7.2 ≈ 6.7 hours
- Level 2 (9.6 kW): ~48 ÷ 9.6 ≈ 5 hours
80 kWh pack (add ~64 kWh):
-
-
- Level 1 (1.4 kW): ~64 ÷ 1.4 ≈ 46 hours
-
- Level 2 (7.2 kW): ~64 ÷ 7.2 ≈ 8.9 hours
-
- Level 2 (9.6 kW): ~64 ÷ 9.6 ≈ 6.7 hours
-
Overnight charging strategies
- If you drive <30 miles/day, Level 1 might top you up enough overnight.
- For 40–80 miles/day, Level 2 gives a comfortable buffer and supports weekend trips without planning gymnastics.
Battery Health—Smart Habits That Extend Range
SOC windows, charging curves, and thermal management
- Keep daily charge in a comfortable SOC window (e.g., 20–80%) when possible.
- AC charging (L1/L2) is gentle compared to frequent DC fast charging.
- Use your car’s scheduled charging and preconditioning to warm/cool the pack before departure—protects range and comfort without stressing the battery.
Breakers, wire gauge, GFCI, and safe extension alternatives
- Use the right breaker and wire gauge for the continuous load.
- Avoid standard extension cords for Level 1 unless they are heavy-duty, appropriately rated, and short—heat is the enemy.
- Inspect outlets: loose/old outlets can overheat under continuous load; replace with quality receptacles.
Smart Features That Make Level 2 Shine
Scheduling, load balancing, demand response
- Scheduling aligns with TOU off-peak windows.
- Load balancing lets multiple chargers share a circuit safely (great for two EV households).
- Some utilities offer demand-response rebates if you let them modulate charging a bit during peak events.
Solar & storage integration
If you have PV, pair an L2 smart charger to prioritize solar excess or charge when your home battery is full. This is where home charging solutions become true home energy solutions.
Who Should Choose Level 1 vs. Level 2
Apartment dwellers & low-mileage commuters
If you can park near a reliable 120V outlet and drive 10–25 miles/day, Level 1 may be perfectly adequate. Portable EVSEs offer flexibility if outlets vary.
Suburban households & multi-EV homes
Daily miles above ~30? Kids’ activities, errands, and weekend trips? Level 2 will change your life—quieter mind, faster turnarounds, and better readiness.
Light commercial & fleets
Fleets benefit from higher-amperage Level 2 and smart load management. Predictable dwell times make AC charging cost-effective versus constant DCFC.
Incentives & Future-Proofing
Rebate snapshots and what to ask your utility
Ask about:
- Charger rebates (often for ENERGY STAR or networked units)
- Panel upgrade incentives
- TOU rate discounts and demand-response programs
Connector considerations and adapters
- Confirm your vehicle’s inlet and compatible adapters (J1772/Type 1, Type 2, NACS).
- If your household has mixed brands, a charger with a universal J1772 handle plus appropriate adapters (or a model with swappable cables) keeps things simple.
V2H/V2G readiness
Some Level 2 setups and vehicles are moving toward bidirectional capability—V2H (vehicle-to-home) and V2G (vehicle-to-grid). If this matters to you, choose hardware with a clear upgrade path.
Simple ROI Calculator (Back-of-the-Napkin)
- Estimate miles per year (e.g., 12,000).
- Estimate kWh/100 mi for your car (e.g., 28).
- Annual energy = 12,000 ÷ 100 × 28 = 3,360 kWh.
- Compare the electricity cost at off-peak vs. on-peak. If off-peak saves $0.10/kWh, annual savings ≈ $336.
- If your Level 2 install (hardware + labor) costs $1,200, simple payback = $1,200 ÷ $336 ≈ 3.6 years—often faster when factoring in convenience and reduced DC fast-charging spend.
Myths, Mistakes, and Pro Tips
- Myth: “Level 2 always charges at the unit’s max rating.”
Reality: Your car’s onboard charger sets the ceiling; a 48A wallbox can’t exceed a vehicle limited to 32A AC.
- Myth: “Level 2 always charges at the unit’s max rating.”
- Mistake: Ignoring cable length and parking orientation—measure twice, mount once.
- Pro Tip: If your panel is tight, consider load management or a smart splitter approved for EVs to avoid an expensive panel upgrade.
- Pro Tip: Use the EV or app to cap daily charge (e.g., 80%) and schedule departures—protects battery and leverages off-peak rates.
Decision Checklist
- Daily miles and dwell time support L1? If no, go L2.
- Panel capacity verified? Breaker/wire sized appropriately?
- Connector matches your car(s) and future purchases?
- Smart features you’ll actually use (scheduling, load sharing, solar)?
- Cable length and mount location mapped to your parking?
- Utility rebates and TOU enrollment queued up?
Conclusion
Choosing between Level 1 vs. Level 2 isn’t about specs on a box—it’s about your lifestyle. If you drive modest miles and have reliable overnight parking, Level 1 can be quietly effective. But for most owners, Level 2 transforms home charging from “it’ll get there eventually” into a smooth, scheduled routine that supports bigger batteries, busier weeks, and spontaneous road trips. Prioritize safe installation, pick smart features you’ll use, and keep an eye on future-proofing (connectors, solar, even V2H). Among all charging options for electric cars, the right home car charging solutions turn your driveway into your personal fueling station—efficient, affordable, and ready when you are.
- Level 1 (L1): Uses a standard household outlet (typically 120V). Slow, simple, plug-and-play.
- Level 2 (L2): Uses a 240V circuit (like an electric dryer). Much faster, usually requires a dedicated circuit and wall-mounted unit (a “wallbox”).
(DC fast charging is Level 3 in casual speech, but technically it’s separate; we’ll stay focused on home AC charging.)
- Level 2 (L2): Uses a 240V circuit (like an electric dryer). Much faster, usually requires a dedicated circuit and wall-mounted unit (a “wallbox”).
Level 1—120V household outlet, slow and steady
- Where it shines: Low daily miles, overnight dwell time, renters who can’t install a circuit.
- Typical power: ~1.2–1.8 kW depending on outlet and EVSE settings (commonly ~1.4 kW at 120V × 12A).
- Real-world result: Adds ~3–5 miles of range per hour for many EVs.
Level 2—240V dedicated circuit, the home-workhorse
- Where it shines: Daily driving above 25–30 miles, bigger batteries, multiple EVs.
- Typical power: ~3.3–11.5 kW (e.g., 240V × 16–48A). Many home units deliver 7.2–9.6 kW.
- Real-world result: Adds ~20–40+ miles of range per hour, depending on car and amperage.
Power Basics—Volts, Amps, kW, and How They Translate into Miles
The formula: Volts × Amps = Watts; Watts ÷ 1000 = kW
- Power (kW) determines how fast energy flows.
- Energy (kWh) is what fills your battery.
Time (hours) = Energy added (kWh) ÷ Power (kW).
- Energy (kWh) is what fills your battery.
Common circuits: 120V/15A, 120V/20A, 240V/30–60A
The electrical code treats EV charging as a continuous load, so equipment is typically limited to 80% of breaker rating:
- 15A breaker → 12A continuous
- 20A breaker → 16A continuous
- 40A breaker → 32A continuous
- 50A breaker → 40A continuous
- 60A breaker → 48A continuous
That’s why a “48A charger” usually needs a 60A breaker.
Hardware & Connectors—What Fits Your Car
Inlets & plugs (J1772/Type 1, Type 2, NACS)
- J1772 (Type 1) has been the common North American AC connector for non-Tesla cars; Type 2 (Mennekes) is prevalent in Europe.
- NACS (often called the “Tesla” connector) is a compact North American interface increasingly supported by new models via native ports or adapters.
Always check your car’s inlet and included adapters before buying a wallbox.
- NACS (often called the “Tesla” connector) is a compact North American interface increasingly supported by new models via native ports or adapters.
Portable EVSE vs. wall box smart chargers
- Portable Level 1/2 EVSE: Great for travel or renters; lower cost; often limited amperage; may lack smart features.
- Wallbox (hardwired or plug-in): Higher amperage, better cable management, robust enclosures, smart features (apps, scheduling, energy monitoring), often best for long-term home charging solutions.
Home Car Charging Solutions—What You Need to Install
Panel capacity check and load calculation
Before installing a Level 2 electric car charger for home, an electrician should:
- Review panel size (e.g., 100A vs 200A).
- Calculate your home’s existing loads (HVAC, oven, dryer).
- Determine a safe breaker size (often 40–60A) and wire gauge.
Dedicated circuit, GFCI, permits, and code
- Dedicated circuit prevents nuisance trips and ensures safe, continuous load.
- GFCI protection is required in many jurisdictions.
- Permits & inspections keep installs safe and compliant—don’t skip them.
Indoor vs. outdoor installs, cable management
- Outdoor-rated enclosures (NEMA 3R/4/4X) handle weather.
- Consider cable length (often 18–25 ft), hanger solutions, and parking orientation for daily convenience.
Costs You Should Expect
Hardware price ranges (Level 1 vs. Level 2)
- Level 1: Often included with the car (portable EVSE), or $90–$200 if purchased.
- Level 2 wallbox: Commonly $300–$700 for reputable models; premium smart units can reach $900+.
Installation cost factors
- Distance from panel to charger (conduit, trenching).
- Panel upgrades (e.g., 100A → 200A).
- Permits and local labor rates.
Typical installs range from a few hundred dollars to a few thousand if panel upgrades or long runs are needed.
- Permits and local labor rates.
Electricity rates, TOU plans, and how to save
Ask your utility about Time-of-Use (TOU) rates. Charging off-peak (often overnight) can cut costs dramatically—especially with Level 2’s faster refill.
Real-World Charging Times
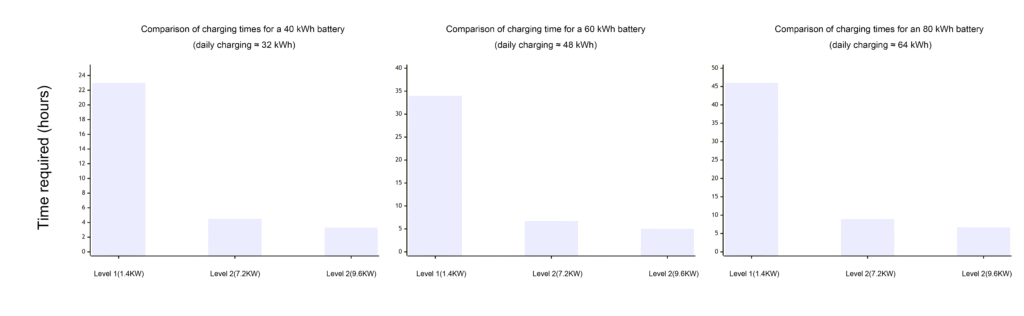
Examples for 40 kWh, 60 kWh, 80 kWh batteries
Assume 10%–90% daily cycling for battery longevity (adding ~80% of total capacity):
40 kWh pack (add ~32 kWh):
- Level 1 (1.4 kW): ~32 ÷ 1.4 ≈ 23 hours
- Level 2 (7.2 kW): ~32 ÷ 7.2 ≈ 4.5 hours
- Level 2 (9.6 kW): ~32 ÷ 9.6 ≈ 3.3 hours
60 kWh pack (add ~48 kWh):
- Level 1 (1.4 kW): ~48 ÷ 1.4 ≈ 34 hours
- Level 2 (7.2 kW): ~48 ÷ 7.2 ≈ 6.7 hours
- Level 2 (9.6 kW): ~48 ÷ 9.6 ≈ 5 hours
80 kWh pack (add ~64 kWh):
-
-
- Level 1 (1.4 kW): ~64 ÷ 1.4 ≈ 46 hours
-
- Level 2 (7.2 kW): ~64 ÷ 7.2 ≈ 8.9 hours
-
- Level 2 (9.6 kW): ~64 ÷ 9.6 ≈ 6.7 hours
-
Overnight charging strategies
- If you drive <30 miles/day, Level 1 might top you up enough overnight.
- For 40–80 miles/day, Level 2 gives a comfortable buffer and supports weekend trips without planning gymnastics.
Battery Health—Smart Habits That Extend Range
SOC windows, charging curves, and thermal management
- Keep daily charge in a comfortable SOC window (e.g., 20–80%) when possible.
- AC charging (L1/L2) is gentle compared to frequent DC fast charging.
- Use your car’s scheduled charging and preconditioning to warm/cool the pack before departure—protects range and comfort without stressing the battery.
Breakers, wire gauge, GFCI, and safe extension alternatives
- Use the right breaker and wire gauge for the continuous load.
- Avoid standard extension cords for Level 1 unless they are heavy-duty, appropriately rated, and short—heat is the enemy.
- Inspect outlets: loose/old outlets can overheat under continuous load; replace with quality receptacles.
Smart Features That Make Level 2 Shine
Scheduling, load balancing, demand response
- Scheduling aligns with TOU off-peak windows.
- Load balancing lets multiple chargers share a circuit safely (great for two EV households).
- Some utilities offer demand-response rebates if you let them modulate charging a bit during peak events.
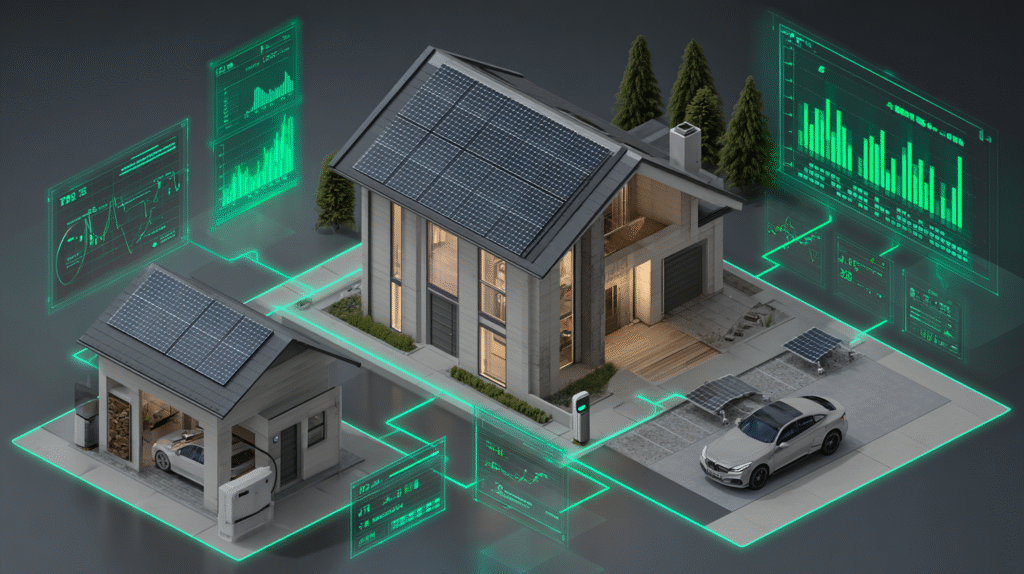
Solar & storage integration
If you have PV, pair an L2 smart charger to prioritize solar excess or charge when your home battery is full. This is where home charging solutions become true home energy solutions.
Who Should Choose Level 1 vs. Level 2
Apartment dwellers & low-mileage commuters
If you can park near a reliable 120V outlet and drive 10–25 miles/day, Level 1 may be perfectly adequate. Portable EVSEs offer flexibility if outlets vary.
Suburban households & multi-EV homes
Daily miles above ~30? Kids’ activities, errands, and weekend trips? Level 2 will change your life—quieter mind, faster turnarounds, and better readiness.
Light commercial & fleets
Fleets benefit from higher-amperage Level 2 and smart load management. Predictable dwell times make AC charging cost-effective versus constant DCFC.
Incentives & Future-Proofing
Rebate snapshots and what to ask your utility
Ask about:
- Charger rebates (often for ENERGY STAR or networked units)
- Panel upgrade incentives
- TOU rate discounts and demand-response programs
Connector considerations and adapters
- Confirm your vehicle’s inlet and compatible adapters (J1772/Type 1, Type 2, NACS).
- If your household has mixed brands, a charger with a universal J1772 handle plus appropriate adapters (or a model with swappable cables) keeps things simple.
V2H/V2G readiness
Some Level 2 setups and vehicles are moving toward bidirectional capability—V2H (vehicle-to-home) and V2G (vehicle-to-grid). If this matters to you, choose hardware with a clear upgrade path.
Simple ROI Calculator (Back-of-the-Napkin)
- Estimate miles per year (e.g., 12,000).
- Estimate kWh/100 mi for your car (e.g., 28).
- Annual energy = 12,000 ÷ 100 × 28 = 3,360 kWh.
- Compare the electricity cost at off-peak vs. on-peak. If off-peak saves $0.10/kWh, annual savings ≈ $336.
- If your Level 2 install (hardware + labor) costs $1,200, simple payback = $1,200 ÷ $336 ≈ 3.6 years—often faster when factoring in convenience and reduced DC fast-charging spend.
Myths, Mistakes, and Pro Tips
- Myth: “Level 2 always charges at the unit’s max rating.”
Reality: Your car’s onboard charger sets the ceiling; a 48A wallbox can’t exceed a vehicle limited to 32A AC.
- Myth: “Level 2 always charges at the unit’s max rating.”
- Mistake: Ignoring cable length and parking orientation—measure twice, mount once.
- Pro Tip: If your panel is tight, consider load management or a smart splitter approved for EVs to avoid an expensive panel upgrade.
- Pro Tip: Use the EV or app to cap daily charge (e.g., 80%) and schedule departures—protects battery and leverages off-peak rates.
Decision Checklist
- Daily miles and dwell time support L1? If no, go L2.
- Panel capacity verified? Breaker/wire sized appropriately?
- Connector matches your car(s) and future purchases?
- Smart features you’ll actually use (scheduling, load sharing, solar)?
- Cable length and mount location mapped to your parking?
- Utility rebates and TOU enrollment queued up?
Conclusion
Choosing between Level 1 vs. Level 2 isn’t about specs on a box—it’s about your lifestyle. If you drive modest miles and have reliable overnight parking, Level 1 can be quietly effective. But for most owners, Level 2 transforms home charging from “it’ll get there eventually” into a smooth, scheduled routine that supports bigger batteries, busier weeks, and spontaneous road trips. Prioritize safe installation, pick smart features you’ll use, and keep an eye on future-proofing (connectors, solar, even V2H). Among all charging options for electric cars, the right home car charging solutions turn your driveway into your personal fueling station—efficient, affordable, and ready when you are.